Sunday, November 18, 2012

Wednesday, September 5, 2012
Cookie Dough Protein Balls (easy, 5 ingredients, gluten free)

I have been searching for a protein ball recipe that was easy to make and used ingredients that I had on hand. The ones that I have found use either oat meal that you need to grind in a coffee grinder (which mine is filled with coffee grounds year around) or they had ingredients in them I really never buy. These Cookie dough protein balls have ingredients that are easy to find and the recipe only calls for 5 ingredients. Which is why I have been making these lately. School has started for my oldest son and these have made my life easier and my two boys can't get enough of them. I will admit, I give these to them as a treat, because they are that good and are good for you! Oh yes, and I call them cookie dough protein balls because I stick them in the freezer and eat them right when I take them out!! YUMMM.
Things you'll need
Air tight container
Spoon and a mixing bowl
Ingredients:
2/3 cup of roasted salted peanut butter
3 tbsp of honey
1 tsp on vanilla
5 tbsp of oat bran (I use TJ's brand)
3 tbsp of the darkest chocolate chips you can find
optional a dash of cinnamon
Mix all ingredients together. Scrape off the top of your measuring spoon while measuring the oat bran. Also, make sure the peanut butter is measured correctly. Using room temp peanut butter will help. Enjoy. :)

Pin It Now!
Thursday, August 16, 2012
Banana Orange Yogurt Pops (great for kids)

I'm not sure about you, but we try to conserve our bills so we haven't turned on our AC yet. And I feel like a trooper; it got up to109 the other day, which was about 84 in the house at the peak... Wow! Back when I use to live in the suburbs, which was last year, I was a AC 73 degree only girl. Our bill one month was around 350 dollars or something like that! I remember my husband mentioning it to me (ever so pointedly). Well, we have changed a bit since then. We live on propane and electric everything now, and lets just say that we spent our reserves on our winter heat in the beginning of the year. 350 on propane and 200 on electric was back in January. We figured out how to use the wood burning stove quick after receiving that bill.
Lately, we figured out a little routine, as soon as we wake up we open all the windows and right around 10am we close them and blast all the fans. Around 4:30 we open all the windows back up and enjoy the day cooling off. It's been way too hot out here to turn on the oven. which leaves us with the freezer as our way of cooling down. We have been making nothing but smoothies, Popsicle and salads. My kids are popsicle lovers. I bet if I put something green in them my kids will still eat one. I might try that! And I love them because you can put pretty much any fruit inside them and they will come out great. I think yogurt, bananas, and orange juice is easy and a Delicious combination. Sweet, sour and creamy.
Things you'll need
Popsicle tray I used these Ice pop molds
blender
Ingredients:
1 cup really ripe mashed bananas
1 1/2 cup vanilla yogurt
1/2 cup of orange juice
Place all ingredients in the blender and blend until combined. Place in the Popsicle trays and freeze for at least 4 hours.
Enjoy

Pin It Now!
Sunday, July 22, 2012
Maple Butter Chocolate Chip Cookies (made with almond meal)

It was the day before my friends son's birthday party and she asked me, "can you make some of those yummy cookies you brought over on our last play date? There will be five gluten free kids at the party and the cupcakes I made taste more like muffins!" OK, I'll admit, I gave her that recipe, But before you jump to conclusions It was not my recipe. I'll keep that blogger anonymous, because hey, we are all here out of love.
I was so excited, I said yes! Then I realized I ran out of my honeyville almond flour. If your not familiar with the difference with almond flour and almond meal here's what I know:
Almond Flour:
Made from blanched almonds so you do not see the bits of brown skin it your cookies.
Finely ground more like traditional baking flour.
binds a bit better.
costs roughly 6 dollars a pound if not more.
can only buy online.
tastes great!
Almond Meal:
made from the whole almond skin and all.
a tad bit more coarsely ground but still a good flour.
binds still good but not like almond flour.
You can find it at TJ's for around 3 dollars a pound.
convenient because you can buy it at most stores.
tastes great!
So I made the cookies for the party with the Almond meal and they turned out yummy and hardy yet still light and fluffy. They are Full of flavor and dark chocolate chips! All in all, they were a crowd pleaser and I was asked to post my recipe. :) Of course!
Ingredients:
4 cups of almond meal
2/3 cup of maple syrup
1 stick of room temp butter
1/2 tsp of sea salt
1 tsp of vanilla
1 cup of the darkest chocolate chips you can find
Preheat the oven to 350. Line a baking sheet with parchment paper. In a mixing bowl add all the ingredients expect the chocolate chips. (a little trick I do) with the cookie dough form a golf ball size ball of dough adding a few chocolate piece while doing this. Then press the ball of dough onto the cookie sheet lined with parchment paper. Very important to press the dough to the size you want the cookies. Almond flour does not spread length wise like wheat flour, but they do rise a bit. After add a few more chocolate chips on top. This makes the chocolate chips stand out more.
Bake for 12-15 minutes or when the edges turn slightly golden.
Makes 30 cookies

Pin It Now!
Thursday, June 28, 2012
Zucchini Soup

Summer squash is here! I set my seeds out on the central
coast April 15th and
started harvesting June 15th. I have 30 zucchini plants and I am
picking about a pound a day which is about 3 zucchinis for me. Wow,
I didn't think they would grow so fast and produce so much! What a
great crop for me, a beginning gardener, and gophers seem to leave them alone. We
have a huge gopher problem here. So far they have taken two pumpkin plants and
a jalapeño plant. They must have been hungry to have taken a jalapeño
plant! J What I've been doing to stop them from returning
is putting sturdy rose bush clippings in the holes. Supposedly, their wounds
don't heal very well. I guess you can visualize the picture. I know this
sounds a bit cruel, but hey, I could be like my neighbor and shove water down
the hole and wait until the gopher pops up from another hole and shovel it. Yikes! I
hope I don’t have to result to that. Not saying I have anything against it,
because, hey, plants have lives too! I truly morn for my plants when I see them
wilt or die after those darn gophers eat the roots. But, I do have to say, they stay clear away from my garden beds
once I fill their holes with rose bush clippings. And about a month later I see
holes again; I fill the holes again with clipping. I think it’s the next litter
that is out to get my garden. You may be thinking why didn't you
just cage in your planting area? Or, use planter boxes! I tried to do the
caging in thing and in the middle of digging huge trenches and trying to lay
down chicken wire that would not stay in place; I gave up and just throw the dirt back
down and planted some seeds. Planter boxes can be costly and that was out of
the question since we are renting. But, I have these tree boxes that I purchase
for 25 bucks each that I cut in half and put chicken wire on the bottom of. For
a total of about 12 dollars I have a 4 square foot and 2 feet deep cedar mobile
planter box. I have 12 of those. That’s where I have my lettuce and tomatoes.
Lettuce and leafy greens I would say never plant in the ground without
protection. Every animal will eat those tasty veggies.
Zucchini
is one of my favorite veggies. You can put them in stir-fry’s and casseroles
and even make noodles out of them. One thing you can’t or I should say I can’t
do, is eat them raw. They don’t have a great after taste to me when eaten raw. If you have a
recipe for raw zucchini that you think I would like, or any other recipe for zucchini, please leave me a
comment with your recipe. I would love to hear what you like to do with
zucchini!
It’s
been about 75-85 degrees her, and it gets in the low 50’s at night. Eating nice
potassium rich zucchini soup sitting on the porch in the evening is ideal for
me. This is my favorite thing to eat when I am starting to get headaches from
the dry heat. Just one medium 7 ounce zucchini has 700 mg of potassium and only
3 grams of sugar. That is insane! C2O coconut water has that much potassium in the entire can
with 26 grams of sugar. So yes, you can find electrolytes in veggies too, if
not more. In comparisons of 100 grams of C2O coconut water vs. zucchini,
zucchini has more magnesium, 6 times more vitamin C and, pretty much more of
every vitamin and mineral found in coconut water.
Let’s eat
Soup! I like mine slightly warm with parmesan or goat cheese sprinkled on top
and sometimes a little fresh cilantro or parsley. Yum. Simple and easy. Just
the way I like my food!
Ingredients:
4 cups of
chicken stock (salted with sea salt)
1.5
pounds of zucchini or about 8 cups sliced
1 medium
onion chopped
3 tbsp of
olive oil
2 tbsp of
butter
Directions
Sauté the
onions with the olive oil until they are caramelized. Add the chicken stock and
zucchini. Cover and let simmer for 20 minutes or until the zucchini is tender.
Turn off the burner and let sit until it reaches room temperature. Puree 2/3 of
zucchini and broth in the blender with 2 tbsp of butter. Add back to the pot
with the rest of the zucchini. Stir, heat and serve.
 |
| caramelize the onions |
 | |
|
 |
| Place the sliced zucchini in the pot with the stock and simmer for 20 minutes until the zucchini is tender . |
Friday, June 15, 2012
How to Cook Squash Blossoms

Oh my, these are incredibly delicious. I'll admit I was a little skeptical to eat a flower at first, but after frying them up and taking one bite, I immediately shoved the rest in my mouth. These are so good! After I picked the blossoms and showed my son's what I was going to cook for a snack, they said ewwww, no mom. Yuk! Of course, after I fried them up they wanted to try them and sure enough they where begging for more.
These squash blossoms tasted so lovely. When I took a bite I had a pop and burst of cheese in my mouth. Oh yes! Now I will be going back outside to pick some more.
How to tell the difference between a male and female squash flower?
Why, eat the male and leave the female to fruit.
Squash Blossoms
Female squash blossoms usually grow close to the center of the plant. Check the base of the flower where the blossom meets the stem. Female squash blossoms have a small swollen embryonic fruit at their base which will grow into a squash.
Male squash blossoms are showier and they tend to hang out on long stem all over the plant. There are more male blossoms then female, and they show up first so like me you may leave a bunch in the beginning thinking they were female.
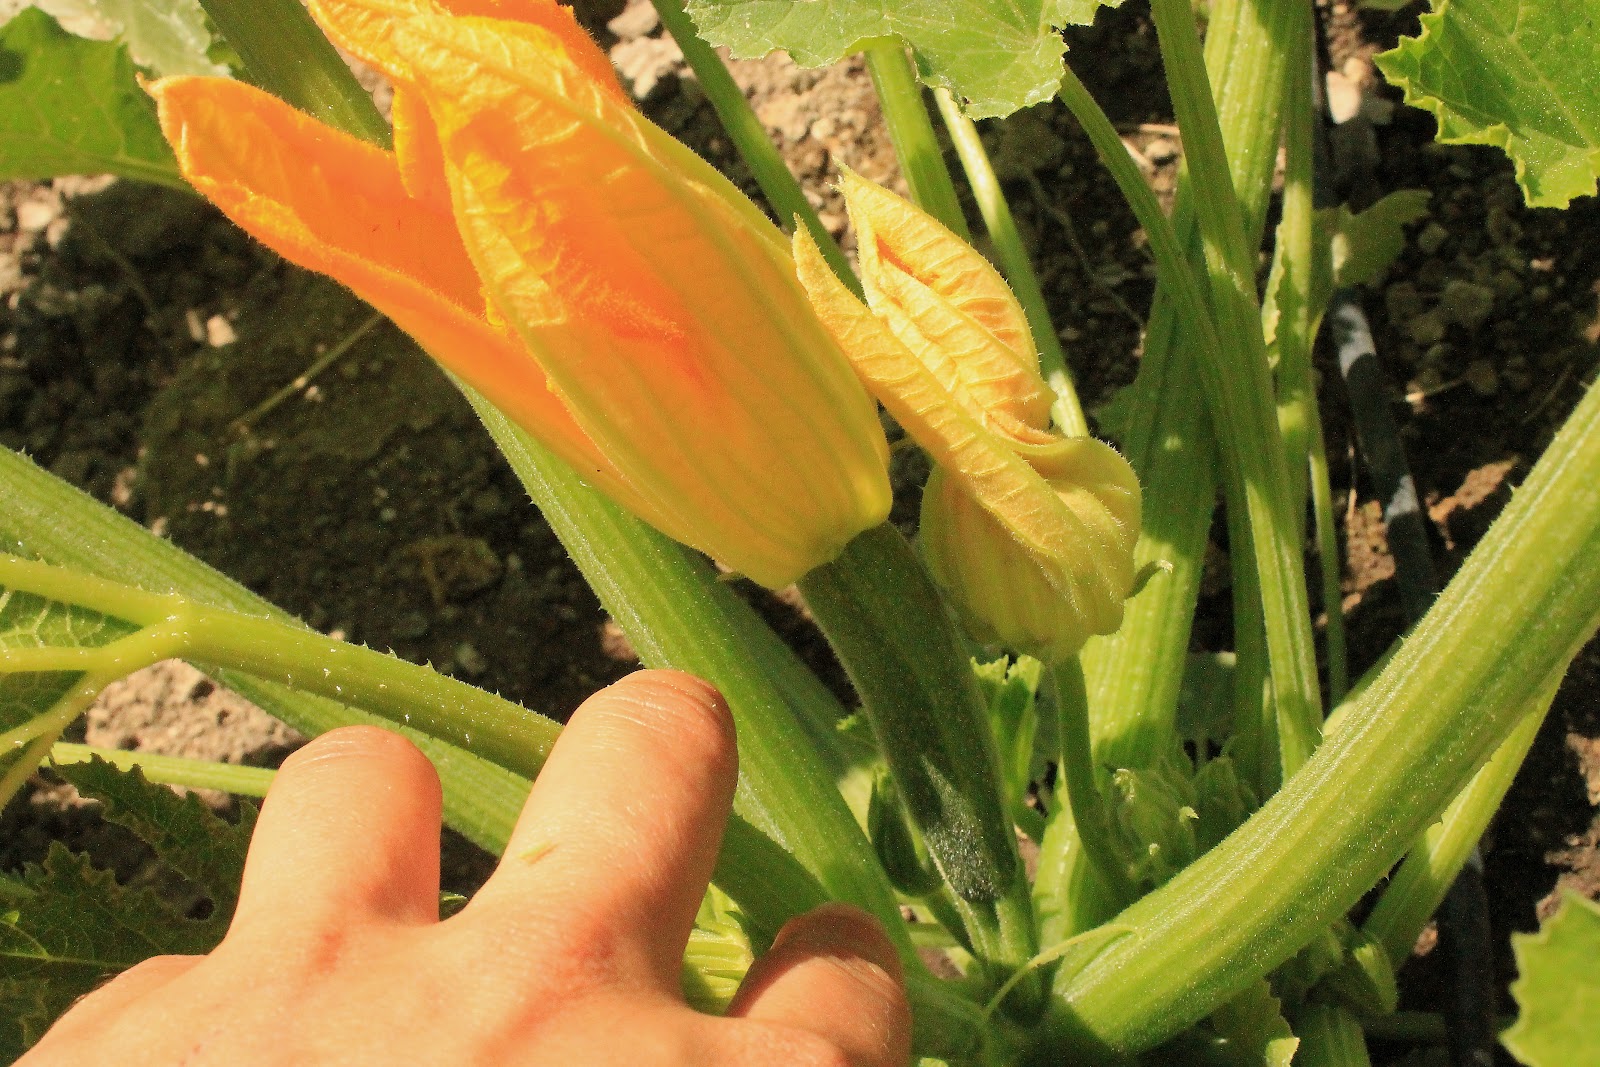 |
The left one, with the mini squash, is the female. The one on the right, with the stem, is the male
|
 |
| Here are some males I picked |
It’s easy to tell the difference, the male will always be on a stem and the female will have a mini squash on it and it will be close to the base.
Gathering the male blooms in the middle of the day is the best time to collect your blossoms.
Squash blossoms may be eaten raw or cooked. Harvest of the male blossoms leaves female flowers on the plant to form fruits; be careful not to collect all of the male blooms, as their pollen is required to fertilize the female flowers. The blooms of any variety of summer or winter squash may be eaten along with the stem.
Both female and male blossoms are edible.
Storing blooms in a bowl of ice water in the refrigerator. Use within two days.
Only female blossoms produce fruit. All winter squash and summer squash including: zucchini, yellow, cork neck, butternut, spaghetti, pumpkins and gourd blooms are edible.
How and When to Pick Zucchini
Once your squash reach 6-12 inches they are ready to be pick. Earlier is ok too. Give them a 180 twist and they should pop off. Keeping in mind, the little part of the stem on the top of the squash, if kept on, will help to preserve it. If you twist your squash off and the left over stem breaks off, no worries, it will just wilt sooner so cook them in the next day or two.

How to cook a squash blossom
Wash by gently opening up the flower and remove any dirt, bugs and the stamen (this is the little pollen in the middle of the flower it is edible but bitter) you can also leave the stems on if you'd like. They are also edible.
Ingredients:
4-6 squash blossoms
Pancake batter of chose (I use one egg to1/4 of almond flour and a pinch of salt)
Herb goat cheese
Chives
Olive oil
In a small bowl combine the pancake batter or one egg, 1/4 cup of almond flour, and a pinch of salt
In another bowl combine about 6 tbsp of herb goat cheese (you want about 1 tbsp for each blossom) and 1 tbsp of chopped chives. No need to measure just eye ball it. And mix around with a utensil.
Heat a skillet on medium heat (lower then smoke point but high enough to crisp the blossoms) with a generous about of olive oil. I use about 1/4 cup.
Stuff the base of the blossoms with 1 tbsp of the herb goat cheese and give a soft twist to the petals to close off the blossom. Then dip the blossom in your pancake batter and place on your warmed skillet. Once the edges start to brown turn and cook the other side for a few minutes. Make sure your oil is not to hot were it reaches a smoking point because the oil will give off unpleasant flavors.
Pin It Now!
Thursday, June 7, 2012
Sunflower Butter Treats (vegan)

It’s
around 3 o’clock and I hear the boys running to the kitchen yelling, “Banana
pop momma!” (Recipe to come) I look in the freezer and then I take a quick half
full breath. I think ok, the organic bananas won’t be ripe for a few more days
and another 4 hours at least to freeze… then I open the cabinet that the boys are now
opening and slamming shut, and look around. Then I begin to think, dried peas? No,
too long to make, dried fruit? No, where’s the protein? Then I see sunflower
butter. And then I remember my sister in law gave me a recipe for no bake peanut butter balls. I thought about it…I could just sub ingredients for what I have on hand. After the quick thought I ask my son, “Do
you want to help?” With wide eyes he says, “Of course mommy.” Then I say, “ok,
open up the cabinet you’re standing in front of, and on the bottom shelf is a
mixing bowl, grab it please. Then get a chair so you can reach the counter top.”
While he is on his mission, I put the baby in her high chair with some teething
toys. Then I grabbed my other son's favorite coloring book with some crayons
and told him to go to town on the floor of the kitchen. “Ok… we can do this!” I say
out loud, I think?
Next, I grab my almond meal, coconut
flour, sweetener, sun butter, and a big spoon. "OH yes! This is going to be so blog
worthy!" Before I jumped to my camera and tripod we begin to mix all the
ingredients together until the batter forms a ball that sticks together. My son starts
to mold little characters out of the dough. J
This all happened within 10 minutes. Viola!
So here we are. No bake chocolate
covered sweet and salty sun butter formed into a
little bit sized ball! All in a simple treat. Well really, they are good for you.
So yes, a treat for your mind, body and the little old spirit!
Ingredients:
1/2 cup sun butter
1/2 cup almond meal or flour
1 tbsp coconut flour (or coco powder if you don't have any)
2 tbsp honey/maple syrup
1/4 tsp sea salt or less
1/4 tsp sea salt or less
1 chocolate bar melted
For unrefined sugar free:
1/2 cup coco powder + 1 tbsp
4 tbsp of coconut oil (melted)
2 tbsp maple syrup (optional 5 drops of stevia)
For unrefined sugar free:
1/2 cup coco powder + 1 tbsp
4 tbsp of coconut oil (melted)
2 tbsp maple syrup (optional 5 drops of stevia)
Things you'll need:
mixing bowl, a spoon to mix ingredients, measuring cup and spoons, airtight container, drying rack or parchment paper, double boiler or a home made double boiler-sauce pot and a glass bowl to fit filled with an inch of water. Bowl should not be touching water. Example
Sunflower butter dough
Mix, sun butter, almond meal, coconut flour and honey/maple syrup together in a mixing bowl until it all sticks together in a ball. Place the dough in the fridge in an airtight container for one hour.
Melting chocolate
Right before you take them out of the fridge, melt the chocolate over a double boiler or a homemade double boiler. break up the bar in pieces and place them in the double boiler or home made double boiler. turn up the heat to low. once the chocolate starts to melt keep stirring until the chocolate is completely melted. Once the chocolate is melted, turn off the and grab your dough.
homemade chocolate
Right before you take them out of the fridge, mix the ingredients in a double boiler or a homemade double boiler. Turn up the heat to low. when the mix is runny turn off the heat and grab you dough.
homemade chocolate
Right before you take them out of the fridge, mix the ingredients in a double boiler or a homemade double boiler. Turn up the heat to low. when the mix is runny turn off the heat and grab you dough.
Grab your sunflower butter dough and make bit size balls.Using a spoon, coat sunflower butter treats with the melted chocolate and place them on a drying rack or parchment paper until the chocolate is set.
Store them in an airtight container in the fridge.
(homemade chocolate adapted from Chocolate Covered Katie)
Tuesday, May 29, 2012
How to Brush Your Teeth with Coconut Oil
I know this is so farfetched for some, but think about how we brushed our teeth before tooth paste was made. If you’re not
into all the additives for shelf stability and massproducing here’s something
to take a gander at!


How to Brush Your
Teeth with Coconut Oil
By Renee Price, eHow Contributor
Brush your teeth with
coconut oil to prevent cavities, eliminate bad breath and reduce the risk of
tooth decay and gum disease. Many people use coconut oil on the scalp to
kill head lice bacteria
and parasites, but coconut oil also works well at killing bad breath causing
bacteria in the mouth. In fact, the glycerin in many commercial toothpastes
derives from coconut oil. Read the label before you use a coconut oil product
for your oral health to make sure it's fit for consumption because some coconut
oil products are designated for hair or skincare. Learn how you can replace
commercial toothpaste and use coconut oil for your dental health.
·
Things
You'll Need
· Mixing bowl
· Tablespoon
· Fork
1.
o 1
Combine 2 tbsp. of melted coconut oil with 3 tbsp. of baking soda in a small bowl to make a
paste. Blend the ingredients together with a fork until the paste resembles a
regular toothpaste. In addition to turning the coconut oil into a paste, the
baking soda contributes to the coconut oils effectiveness with its own
teeth-whitening benefits.
o 2
Wet your tooth brush with warm water and
place enough of the paste on your tooth brush to cover the brushing
surface. Brush your teeth in a circular motion with the coconut and baking
soda paste focusing on a small group of teeth at one time. Brush your tongue to
distribute the paste and remove bacteria to freshen your breath.
o
o 3
Rinse your mouth with a cup of water and
avoid spitting out the water in the sink. Spit out the rinse outdoors or in a
trash bag and discard. Coconut oil hardens at cold temperatures, so traces of
the oil poured down your drain could clog your sink if rinsed with cold water.
o 4
Continue this process a few times a week
to experience the benefits of brushing your teeth with coconut oil.
Tips & Warnings
· Combine a packet of artificial
sweetener and peppermint oil in your paste to add flavor.
· Store your paste in the bathroom, not
the refrigerator, to prevent the coconut oil content from hardening the paste.
· Some vegetables are natural
abrasives and eating them scrubs your teeth in a natural and harmless
way. They act like toothbrushes. These vegetables include carrots, celery and cucumbers.
· Baking soda is a classic
amongst natural teeth whitening methods, and is indeed harmless. It is very
effective in removing stains and killing plaque-causing bacteria, and it also
reduces acids which harm your tooth enamel.
Monday, April 16, 2012
Moist Chocolate Cupcakes

I made these yummy cupcakes for my son's
birthday and I have been requested to post this recipe. They are so easy, super
moist and of course scrumptious. The frosting is made with coconut oil, milk and agave or honey. This Coconut Oil vanilla Frosting is the best frosting I have ever made and you wouldn't believe that it's low glycemic by its taste. Holds up to room temp too!! :)
Ingredients:
1 Jar of salted almond butter (room temp)
1/2 cup agave or honey
2 eggs
2 large bananas (very ripe)
1 tsp baking soda
1/4 cup coco powder
preheat oven to 300 degrees.
First in a large bowl mash bananas to an even
consistency; add the eggs, 1 jar of almond butter, agave or honey and
baking soda. Lastly sift the coco powder in the bowl. Stir until evenly
combined.
Place cupcake papers in the muffin tin of chose.
Fill the muffin tins about 1/8 of an inch to the
top of the paper.
Bake for 15-20 or until a top pick runs clean.
Cool before you frost the cupcake.
Enjoy!
Sunday, November 20, 2011
Coconut Oil Vanilla Frosting

I have been working and looking for a recipe for
frosting that was low in sugar and high in flavor for a long time. And I have
found one form babycakes recipe book that I have made a little different. This
is actually the best tasting frosting I have ever had. I made this recipe the
day before my son’s birthday party and everyone loved it. This recipe is enough
for 2 dozen cup cakes and it lasts for up to a month in the fridge. I made
these with an almond butter banana chocolate cup cake. I’ll post that
recipe when I have more time. Right now I’m thirty seven weeks pregnant with my third and I still haven’t
packed my hospital bag. I’ll be doing that today and shopping for whatever I
don’t have on the list. I’m excited and nervous.
recipe here for, Moist Chocolate Cupcakes (low glycemic)
recipe here for, Moist Chocolate Cupcakes (low glycemic)
Ingredients:
- 1
1/4 cup milk (regular cow's milk)
- 1
cup dry milk powder
- 1/4
cup agave
- 1
1/2 cup coconut oil
- 1tbsp
coconut flour
- 1
tbsp vanilla
- 2
tbsp of lemon juice
In a food processor or
blender add the milk, dried milk, agave, coconut flour and vanilla
and blend for 1 minute. Liquefy the oil (add to a sauce pan on low heat
until it becomes liquid. make sure that the liquid amount adds up to 1 1/2
cups). While the food processor is on add the liquefied oil slowly. After you
add the oil let blend for 30 more seconds. The frosting will be runny
until the coconut oil cools by placing it in the fridge for 4 hours.
Pin It Now!
Friday, November 11, 2011
Pumpkin Pie Oat Meal

I am so happy that we finally found a place to
call home. I've been away from my blog because the house we were
renting became inhabitable and unsafe for us to live in any longer.
We stayed in my brothers RV for one month parked out in front of our local
beaches on the central coast. Being by the beach definitely helped the sad
feelings of not having a place to call home, especially because I was
about 7 months pregnant and unable to get ready for the new baby. The kitchen
in the RV was not suitable to experiment in (and really challenging
to cook or bake anything at all!). I was also very
distracted by everything that was left to do in the middle of moving: storage
for our five cars, where our dog was going to stay, storage for all of our
stuff, and where we were going to live. Well, with much patience my husband I
searched night and day to find this wonderful place we now call home. And the
house is great; we live in a beautiful neighborhood on three acres that has
tons of play area for the kids to frolic for hours. I haven’t even been to
the park since we moved in because we've been here having so
much fun.
If
you’re wondering how we’ve been settling in to our new place, well, its going
ok…. Who am I kidding? We are still in boxes and my cravings and lack of a
functional kitchen for a month has left me with some unique dinners to say the
least. I know when my husband asks for the salsa or the cheese, I must be
slacking on taste or spice.
But,
I have been making this pumpkin pie spice oat meal lately for the kids.
Yesterday, when I went shopping for Thanksgiving kitchen supplies, my husband
couldn’t figure out what to give the kids for a snack. So he called me and I
told him to warm up the leftover pumpkin pie spiced oat meal. When I returned
home a few hours later he told me that the cereal thing you made was so good
and he would eat that for breakfast everyday if I made it for him to take to
work. So I agreed with a big grin.
ingredients:
Water- 2 ½ cup
Old fashion oats- 1 cup
½ cup of almond meal
Sea salt- 1/8 tsp
Pumpkin- fresh or canned – ¾ cup
Maple syrup – 4 tbsp
Vanilla – 1 tsp
Cinnamon – 1 ½ tsp or more
Pumpkin pie spice – ½ tsp or more
Milk of choice or half and half
Bring the water to a boil and add the oats.
Cover and simmer on low (keeping a slight boil) for 5-10 minutes (depending on
how soft you want the oats). Add the almond meal and cover and simmer for
another 5 minutes. Stir in the sea salt pumpkin, maple syrup, vanilla, cinnamon
and pumpkin spice. Then I cover and let stand with the heat off for a
few minutes. Serve with milk or half and half.
Note: Leftovers will always need to be heated
with extra milk. If you add extra pumpkin you’ll need to add more maple syrup
because of the bitterness from the fruit.

Saturday, September 10, 2011
Chocolate Chip Cookies

Chocolate chip cookies are easy to make and traditional. When asked, most people would say chocolate chip cookies are their favorite cookie which makes them pretty much a crowd pleaser. At my houses we make them all the time – my boys love them! I was inspired by a recipe from http://www.elanaspantry.com/. Whenever I make these, I usually double up the batch stick them in the freezer and take them out whenever I need them. This recipe calls for butter… I love butter… I can give up gluten but I will never give up dairy. To me it’s like living without a toe, “you always think about it and wish it was there. Of course, I wish I could raise a cow off of nothing but grass and milk the cow myself and turn my own butter, but that’s not the case just quite yet! Until then I will buy organic. But, if you’re unable to use dairy, coconut oil is a great substitution. I hope you enjoy this recipe!
Ingredients:
2 ½ cups almond meal
(almond flour works too)
½ teaspoon of sea salt
½ teaspoon of baking
soda
½ cup of butter
¼ cup of agave nectar
¼ cup of apple sauce
1 teaspoon vanilla
extract
½ cup of chocolate
chips
In a large bowl,
combine the almond meal/flour, sea salt, and baking soda.
Turn a burner on low
heat. Place the butter in a medium sized sauce pan on the lit burner.
Once the butter is melted take off the burner and add agave nectar, apple sauce
and vanilla.
Mix the wet
ingredients in to the dry.
Add half the chocolate
chips (1/4 cup) to the dough and stir.
Cover and place in the
freezer for 1 hour.
Remove from the
freezer and preheat the oven to 350 degrees.
Line a baking sheet or
a pizza brick with parchment paper (I like to use a pizza brick).
Take a generous
tablespoon size scoop the dough and roll it into a ball with the palm of
your hands, then place it on baking sheet or pizza brick and press it down with
your fingers or palm (important to press down or it will look like a cookie
scone: ).
Now add the rest of
the chocolate chips on top.
Place in the
preheated oven and bake for 18-20 minutes, until the top of the cookies is a
light golden brown.
Monday, September 5, 2011
Easy BLT Wraps

I love bacon as I’m sure most of the world does. This is a great recipe to make when it’s hot and you just want to sit outside and eat. Lately in the kitchen, I've been trying to make more "Dude Food" meals to make my husband excited when he sees what I made for dinner. And he did as soon as he saw the bacon and roasted potatoes. :) Now, if I didn't make a starch with these wraps my husband and kids would keep asking for more food after dinner – not to say that these wraps aren't good by themselves. As we sat down for dinner this evening, this meal sure kept us all quite for a good half an hour – with no after dinner munchies!
Ingredients:
1 pound of bacon cooked
Sliced provolone cheese
2 large tomatoes
2 avocadoes
Butter head lettuce or
green leaf lettuce leaves
Tooth picks
- Slice up the tomatoes and avocadoes
- Make a little station to make assembly easier
- Lay a piece of lettuce then cheese, bacon, tomato and
avocado
- Roll up and place a tooth pick in to keep in place and
slice the lettuce rap in half or thirds
- Plate and serve with mustard dip and pickles
Mustard Dip
Ingredients:
½ cup of Greek yogurt
(full fat works best or cheese yogurt)
1 tbsp of yellow mustard
1 tsp of Dijon mustard
1 tsp of agave nectar
A pinch of dried dill
Salt and pepper to taste
- Place the Greek yogurt in a measuring cup
- Add the yellow mustard, Dijon mustard, agave nectar and
dill in the cup and mix
- Add salt and pepper to taste

Simple Roasted Potatoes
- Preheat the oven to 425 degrees
- Cut up 8 red potatoes into 1 inch cube
- Drizzle with olive oil and ½ tsp of sea salt
- Place
on a pizza brick and bake for 45 minutes or until golden brown
Tuesday, August 30, 2011
Orange Julius Smoothie

I love this smoothie
throughout the day, but we end up making it in the morning because my kids
usually beg for it, they say, “orange shake please.” It’s been about 95-100
degrees daily out here on the central coast and this bright citrus smoothie
wakes me up just in time for our morning walk which needs to be before 10am. I
hope you try this recipe out and maybe add your own touches to it!
Ingredients:
Ingredients:
1 cup of yogurt (I use
cream line for its mild taste)
2 medium sized oranges
1 cup of frozen
pineapple
½ a ripe banana (if you
prefer a sweet taste)
- Peel the skin off of the oranges and take out seeds if
need
- Place all the ingredients in the blender and blend for
1 minute
- Serve
Saturday, August 20, 2011
Protein Bars

¼ cup of honey
¾ cup of peanut butter
¾ cup of almond butter
1 tsp vanilla
½ tsp of sea salt (if
your nut butter is salted disregard the sea salt)
1 cup dried milk powder
2 tbsp of coconut flour
1 cup of toasted chopped
pecans
2 ½ cups of puffed brown
rice (unsweetened)
Optional ½ cup of
chocolate chips and or raisins
Line a 13x9-inch baking pan with wax paper
- In a large saucepan over medium heat, combine the
honey, vanilla and sea salt; heat up just before a boil. Remove from
heat.
- Stir in the nut butters and remaining ingredients
expect the chocolate and raisins. And the chocolate and raisins once the
batter’s not to warm (or garnish them on top after pressing the
bars into the dish)
- Press in to the baking dish with a piece of wax
paper on top to prevent from sticking.
- Place into the freezer with the wax paper still on top
for 1 hour. Cut into bar sizes and store them in plastic baggies or air
tight sealed containers.
I hope you enjoy these as my family does!!!
 |
| Add some chocolate! |
 |
| Kid approved. |
Monday, August 15, 2011
Summer Squash Mac & Cheese

I love summer squash
especially since it’s in season. And this is totally a kid friendly dish
as most of my dishes are. I hope you enjoy this recipe!
Ingredients:
1 medium purple onion
5 tbsp of Olive oil
5 cups of chopped
yellow squash
2 cups of brown rice
pasta
Water
½ tsp of Sea salt
1 cup of extra sharp
cheese (I used a mix of Cabot and New Zealand cheddar “TJ’s”)
Garnish with extra
cheese
- Add the pasta to a pot of boiling water for 8
minutes. When the pasta is tender immediately drain the water (saving 1
cup of the water)
- In a skillet sauté the onions with the olive
oil until golden brown. Then add the squash, pasta water, sea salt and
simmer for 20 minutes with the lid on.
- Once the veggies are tender stir in
the pasta and cheese
- Serve
Servings: 4 people
Friday, August 12, 2011
Perfect Banana Pancakes
I love summer squash especially since it’s in
season. And this is totally a kid friendly dish as most of my dishes are. I
hope you enjoy this recipe!
1 medium purple onion
5 tbsp of Olive oil
5 cups of chopped yellow
squash
2 cups of brown rice
pasta
Water
½ tsp of Sea salt
1 cup of extra sharp
cheese (I used a mix of Cabot and New Zealand cheddar “TJ’s”)
Garnish with extra
cheese
- Add the pasta to a pot of boiling water for 8 minutes.
When the pasta is tender immediately drain the water (saving 1 cup of the
water)
- In a skillet sauté the onions with the olive oil until
golden brown. Then add the squash, pasta water, sea salt and simmer for 20
minutes with the lid on.
- Once the veggies are tender stir in the pasta
and cheese
- Serve
Servings: 4 people
Subscribe to:
Posts (Atom)